Monday, November 18, 2013

Holiday 2013 To-Do List

Thanksgiving is only a little over a week away and Christmas is right around the corner.  I think I better get my to-do list made and hopefully I can get all the projects I am planning done in time for the holidays. 

I hope to have a few projects done in time to distribute them around Thanksgiving or shortly after.
  • Christmas Banners with holiday greetings like "BE MERRY", "JOY", "PEACE"  and "NOEL".
  • I want to make another Advent Calendar and I think my We R Memory Keepers Envelope Board will be just the right tool for the job.  I am deciding between small envelopes filled with activities or small envelopes that can hold treats.  Maybe I will make it a combination of the two.
  • Finishing up my Christmas cards.  I bought an amazing card kit made by Anna Griffin and it has enough to make 60 homemade cards.   I think I have made 10 so far. 
This year, I am trying to think about what is most important about the holidays and I want make as many gifts as I can.  I have a few great ideas for homemade Christmas gifts. 
  • I am up-cycling some metal Tazo tea tins to hold handmade card sets.  Lucky for me, I have a good friend who has been collecting these tins so I should have enough for five sets.
  •  I am a pretty novice crocheter, but I found the cutest pattern for an infinity scarf on craftgawker.com.  Puff Scarf Instructions
  • Christmas cookies - I want to do a day of baking and I am compiling a list of my holiday favorites to make this year.  So far, lime melt-aways, macaroons, and some sort of chocolate cookie are on the list.  Time to break out my Martha Stewart Holiday Cookies magazines for inspiration.
I would love to hear what items are on your holiday to-do lists.  I will be sure to post photos of the items I am working on.
Thanks for reading!

Tuesday, October 29, 2013

Halloween Cards 2013

I love creating crafty things for Halloween.  This year I made a wreath for an auction at work  and last night I finally made my Halloween cards.  I get it, it is in fact October 29th and if I get them in the mail today, hopefully they will be received by Halloween.  Luckily they are mostly traveling locally and shouldn't take more than a day to be delivered.
For the cards I used Mambi card packs for the card bases, October Afternoon Witch Hazel papers and postcards, American Crafts ribbons and twine, and stamps from Impress.  Here is a sampling of the cards:


Sunday, September 15, 2013

Halloween Paper Cone Wreath

Sorry for the delay in posting these instructions.  I did mean to get this post done by Friday the 13th, but somehow time got away from me and now it is Sunday the 15th and a little less spooky.  But there is still plenty of time to make one of these wreaths in time to decorate for Halloween. 

These are the items you will need to construct the Halloween Paper Cone Wreath:
  • Book pages
  • Chipboard
  • Double Stick Tape
  • Embellishments
  • Foam Adhesive
  • Glue Gun & Glue Sticks
  • Large & Small Scallop Paper Punches
  • Pencil
  • Ribbon & Twine
  • Scrapbook paper
  • Wet Adhesive
Book Paper Cones 
Punch Large Scalloped Circles

Punch 28 large scalloped circles from the books pages.  I just use old paperbacks.  I find that you can punch 4-5 pages at once using the large paper punch.


Add Adhesive

Apply the wet adhesive to one side of the book page circle.  I like to use wet adhesive for the book page cones. I used Scotch brand quick drying wet adhesive for this project and it worked fantastically.
Roll Circle into Cone Shape

Using a sharpened pencil, I roll the scalloped circle into a cone shape.  I would work on a non-stick surface when doing this step.  Do not worry if some of the adhesive gets on the outside of the cone, it dries pretty quickly. Make 28 cones.


 Scrapbook Paper Cones
Punch Large Scalloped Circles

Punch 18 scalloped circles from scrapbook paper.  Make sure to use double sided paper, because you will be able to see the inside of the cones. 


Roll into Cones
For thick scrapbook paper, I use double stick tape to adhere the cones.  Place a strip of tape in the same position as the wet adhesive on the book pages and roll the circle into cone shapes using the pencil.  Heavily glittered paper may require the use of hot glue instead.  Make 18 cones.
Assembling the Wreath
The Base Layer

Using a CD as a template, cut a large circle out of lightweight chipboard.  Begin arranging the paper cones in a pattern.  I like to map out a pattern first, before hot gluing the cones to the chipboard.  For this wreath I use two book page cones in-between each scrapbook paper cone, so 20 book page cones and 10 scrapbook cones.
Hot Gluing the Wreath

I use a hot glue gun to adhere the paper cones to the chipboard base.  I start with a scrapbook paper cone and glue it in the 12 o'clock position and work my way around the chipboard circle.  I use the pencil inside the cone to position the cones right next other.  It keeps the cones tightly positioned and also protects your fingers from the hot glue.
The Second Layer

First, cut about a quarter from the tip of 8 book page cones and 8 scrapbook paper cones.  These will make up the second layer of the wreath.
Using hot glue, adhere the 16 cones in an alternating book page cone and scrapbook pattern on top of the base layer.  By using hot glue, you will create a wreath that is rather sturdy.
Embellishing The Wreath

To ensure the wreath stays together, I like to fill the center of the wreath with hot glue and glue a small scalloped circle in the middle.  This also provides a base to further embellish the middle of the wreath.
Adding a Ribbon Hanger

To add a ribbon hanger, first punch two small scalloped circles from chipboard and add hole punches in the middle of each circle.  Thread ribbon and knot through the holes.  Now hot glue these two circle to the back of the wreath. 
The Finished Wreath

To finish the wreath I added a number of additional embellishments to the center of the wreath using scrapbook paper, ribbon, and buttons.  I adhered the center scrapbook paper embellishments with double sided foam adhesive.  The foam adhesive provides the dimension you need to fill the center space of the wreath.  I hot glued the buttons on once I threaded them with ribbon and twine. 

Products I used

  • My Minds Eye Lost & Found Halloween papers and accessories sheet
  • Graphic 45 Staples Paper Buttons
  • October Afternoon Witch Hazel Buttons
  • American Crafts Twine
  • May Arts Black Chevron Ribbon
  • Scotch Quick Dry Wet Adhesive
  • Scotch Double Sides Tape
  • Adtec Two Temp Glue Gun
  • Lifestyles Crafts non stick work mat
  • Glue Arts glue gun tools and mat

Monday, August 26, 2013

September Crafts: Halloween Cards and Wreaths

Well since it is almost September I better get started on my Halloween cards. I love sending cards out at Halloween.  It gives me an opportunity to buy fun Halloween paper (or use the fun Halloween paper I bought last year?).  I think this year I will also make a few Halloween wreaths to give out as well.  I think I read somewhere it is the second most decorated for holiday after Christmas so maybe someone might want a Halloween wreath.

My next post will be instructional and detail how I make the paper cone wreaths I recently posted on Pinterest.  Honestly the Christmas Paper Cone wreath I pinned is the first pin that has been re-pinned by people I am not directly friends with.  It is kinda of exciting for me.

If you are interested in making your own paper cone Halloween wreath these are supplies that you will need:
- Book Pages (cheap books are always available at library book sales, yard sales, thrift shops, etc.)
- Chipboard
- Glue Gun and Glue Sticks
- Large Scallop Edged Circle Punch
- Patterned Scrapbook Paper
- Pencil
- Ribbon

So get your supplies together and come back on Friday September 13th!
Thanks for reading.


Monday, July 29, 2013

Craft Room Reorganization - Summer 2013

My pegboard holds my scissors (fancy and regular), some punches (I need to buy more loops to hang the others), my tape runners, my corner chompers, rules, markers, clipboard and the only scrapbook page I have ever made.


Let's talk about craft organization.  I am lucky enough to have a whole room dedicated to crafting space, but having a whole room just means more space to put stuff.  Organizing it in a useful way has taken some time.  I have been known to pile things on surfaces and work on crafts on a tv tray in front of the television in the living room.  There is nothing wrong with that, but I know I am so much more creative when I can work in my own craft space.  I recently got a peg board for my craft room.  My husband found it for less than $2 in the scrap bin at Home Depot. My brother-in-law spray painted it for me and they mounted it on the wall.  I bought the hooks and pegs on Amazon and the whole project cost less than $20.  I love it.  I hang the things I use the most from it and it honestly makes me really happy.  It is the anchor for my craft room.
I moved all my plastic storage bins below it. I keep all my stamping supplies, punches, paper trimmers and card making supplies in the larger bins. In the smaller bins I keep adhesives, twine, paper ribbons, washi tape, alphabet stickers, and embellishments. I organize all my scrap pieces of paper in open paper trays and sort them by color.  Under the trays of scraps I keep holiday related papers, sorted by holiday.

I sort all my ribbon by color and hang it on the wall.  This makes it easy for me to visually take inventory of what colors I have and it is simple to grab for any project I am working on.  This ribbon holder was made with three pieces of photo paper, a circle punch, and a yardstick.
The teal cart I purchased at Ikea and use it to hold all my letterpressing supplies,  It conveniently holds all my inks, cards, the L Letterpress, plates and cleaning supplies.   It also holds all the supplies for tissue paper flower making as well.
I have a small cart that holds canisters of buttons sorted by color and mason jars filled with paper flowers.  Below are various card kits, paper collections from American Crafts and containers of glitter tape. 
My work surface is a 4ft table from Costco with an Ottlite lamp.  The magnetic white board and bulletin board is perfect for ideas and to do lists.  I have American Craft paper boxes to sort my colored cardstock.  One box to hold 8.5"x11" paper, one to hold 12"x12" paper and one to hold plain chipboard and neutrals.  Below my table I store all my scrapbook paper in vertical Iris paper containers.  I store my paper alphabetically by brand and collection.  To the right of my work surface I have a gift wrap cart where I store wrapping paper, tissue paper and gift bags. 


I have a black storage unit from Ikea that I store all my other crafting items in.  Each compartment holds different supplies.  You can easily see my Cuttlebug, my 9" Xyron machine (which my husband spotted at Goodwill for $6 in perfect condition with a full roll of sticker adhesive!) and a ton of other crafting supplies stored in this unit.
On top of the unit I have a magazine organizer I purchased from Michaels and assembled myself.  I store back issues of Papercrafts magazine and other odds and ends like labels and notepads in it.  I have my Artbin full of Copic and Prismacolor markers and my crafting caddy on display as well.  My Clip-it-Up holds all my small embellishments like rhinestones, adhesive flowers and brads.  I was lucky enough to find one on Craigslist for $50 and it is so useful. I also keep my rolodex style address book and birthday/anniversary calendar on display as well. 
The room also has room for another small table so I have space if other people want to come over and craft. I try my best to keep it tidy, but when it gets cluttered I can always close the door.
All in all, the storage pieces and work space cost less than $400 to outfit. I did it over time and could not be happier with the results.  I love my craft space.

Monday, July 1, 2013

June Crafting Hiatus

I was doing so well.  I was keeping up with my twice a week posts, being inspired, making crafting a priority and then June came around and it was if I just hit a crafting block.
Sometimes I wish that crafting could be my day job.  Then I could create and blog day in and day out.  Right now, I craft when I have time and somehow the month of June flew by and very little crafting was done (with one exception: invitations to my sister-in-law's baby shower) and I neglected ihearthello. 
Well as summer is in full swing I have some summer crafting goals for July-
  • Re-organizing my craft room.  I plan to paint my craft room and rearrange some things this weekend.  I will be sure to take photos. 
  • Make my Sister-in-Law something crafty for niece's room.  She is due in August, but her shower is in two weeks so I better motor on making something,
  • Make July special events cards.  Lots of birthdays, anniversaries and weddings this month!
  • Start planning holiday crafts.  I really want to participate in Urban Shopping & Cocktails October event as a vendor.  This would be a HUGE thing for me, but would clearly require me to step up my crafting game and create some inventory.  I want to make bunch of holiday crafts and paper wreaths like these:


So all in all, July looks like a month that is sure to be filled with crafty goodness and reasons to blog.  Blogging every Monday and Friday was a little stressful, so I may reduce it once a week on Mondays and the occasional random post as well.
Readers - let me know if there is something you would like to see on the blog.  Ideas for crafts,  questions about crafting?  I would be happy to provide information and answers.
Thanks for reading!

Friday, June 7, 2013

stuff i ♥ - Impress & Fresh Ink


Let's talk stuff I am obsessed with: whimsical papercrafts, making cards, and writing this blog.  Additionally, I am absolutely in love with the store Impress.  It is mostly a stamp store (you can find physical stores in Tukwila, University Village and Bellevue Square and online at www.impressrubberstamps.com). 

It is so much more than your average stamp store though.  At their store in Tukwila, they offer thousands of stamps, a ton of lovely dies, inks and punches and ribbons galore.  Not to mention their stock of twine and brads.
Not only do they offer the most amazing wood mounted rubber stamps, their stores are chock full of inspiration and ideas.  The card above is from their website.   Their designers come up with the most darling designs for stamps, cards and decor.  If you look closely, that card is simply two stamps (the flower and the sentiment).  As simple as it seems, it is also perfectly elegant and divine in its simplicity.  Inspiration like this is all over their store. It is hard not to try and buy every new stamp I come across. 

I am always so inspired whenever I shop there.  Besides their stamps, the one item from Impress
I am most impressed with (ha!) is their Fresh Ink ink pads. I have always love stamping, and stamping and card making really go hand in hand. Once I tried Fresh Inks it was if I had never really stamped before. It was really a revelation in my stamping.

The pigments are so saturated and the colors really pop on paper. The ink coats stamps beautifully and images always come out super crisp and clean. I don't have to worry with large stamps that the color will be faded in some spots, the ink covers images perfectly every time.
Have I mentioned that they come in a myriad of colors. I believe they come in 44 different colors at this time.

I own at least ten of these ink pads and am always adding to my collection.  My absolute favorite color combination is the Pink Lemonade and Navy.  I am also very fond of the Mango and Grass together as well.

The Fresh Ink pad last a ridiculously long time as well, but if you find the need to re-ink your pads, Impress also sells the inks to do so.

If you live close, I encourage you to visit one of their stores in person.  If you live far away, definitely check out their website for unique stamps, Fresh Ink pads and loads of fun ideas to try at home.

Thanks for reading!


Monday, June 3, 2013

Door Hanger Organizer

i ♥ hello blog fans, I did not mean to ignore you this fine Monday.  In fact, I have all sorts of things I want to write about and share, but somehow my birthday weekend got in the way and there was no post on Friday.  Well I do have a project to post today, hooray!  I originally saw this idea for a great organizer that you can hang on your front door knob on the http://www.paperboutiquewithlinda.com/
Here is the link to her original project Door Organizer How-To Video .  I just think this is the perfect thing to hang on your front door. I used the Basic Grey "What's Up" line to make the organizer. I made a small notebook (2"x3") to include as well.  The notebook is ideal for to-do lists, grocery lists, etc.  The organizer has three pockets so you slip envelopes that you need to mail, bills, cards and whatever else you might need to remember to take with you before you head out the door.


Tuesday, May 28, 2013

A winner, a holiday weekend and a baby shower

So I am pretty excited that I have more followers now.  You all help to keep me accountable to people other than myself.  Now for the winner of the i ♥ cards birthday cards: Clay!  I'll get in touch with you to get these cards to you as soon as possible.
My March craft goals are finished and I have one gift left to deliver and one gift left to mail.  Once these have made it to the their recipients I will reveal them on the blog.
The holiday weekend got the best of me and I managed to miss two blog posts (what happened here?  Honestly I am not sure).  I promise to not let this happen again.  But I did do some crafty things over the long holiday weekend.
I went to one of my favorite stores, Impress (http://www.impressrubberstamps.com) in University Village this weekend and purchased stuff for my sister in law's baby shower.  I adore this store I am super excited to make the invitations and decorations.  In addition to the invitations, I plan on making a banner and perhaps a diaper cake.  Here is a diaper cake I helped make a few years ago:


I am probably going to make something similar to this for her shower, but add accents in mint green as well.  I love how the butterflies seem to be flying every which way on the "cake".  I think the hardest part about this cake was rolling the diapers (and someone else did that) so I will be searching the internet for how to fold diapers soon. All this "cake" required was a Martha Stewart butterfly punch, some patterns paper, ribbon and floral wire.  I'll be sure to post pictures of the invitations and decorations I make for this upcoming shower as well.   Thanks for reading :)


Monday, May 20, 2013

Stuff i ♥ - washi tape

Let me take a moment to talk about my obsession with washi tape.  I ♥ the stuff.  I use it on nearly every project I make.  This photo showcases just a portion of my washi tape collection.  When I bought the We R Memory Keepers Washi Tape dispenser, I really should have purchased a second (or maybe even a third).  The patterns, colors and widths of washi tape available make it so that I almost always am buying a new roll when I am out purchasing supplies. 
There are so many crafty uses for the stuff.  I love that washi tape isn't so tacky that mistakes are un-fixable.  In fact, washi tape is forgiving you can reposition it on your projects with ease. 
You can make quick cards with just a plain piece of cardstock and a few rolls of washi tape.  It is easily cut into banner shapes and pennants. I like to use it to add texture and contrast to the bottom edge of my cards.  ou can use it to do so many things. 
In fact another blogger posted 100 projects with washi tape.  Next time you are at the craft store, pick up some washi tape and give it a try.  Hopefully you will ♥ it as much as I do! 

Friday, May 17, 2013

i ♥ cards : three easy cards

I want to make this a weekly feature where I showcase how to make cards.  This week, I made three happy birthday cards with just a few supplies and less than an hour:
- (3) A2 sized cards (these are from the Pebbles card pack)
-  scrap strips of paper
-  happy birthday stamp
-  pink ink pad
-  washi tape
-  brads
-  twine
-  adhesive tape gun and foam tape
-  extra small hole punch
 Card ♥ #1 - Banner Card
Instructions
- Cut strips of paper in varying widths and lengths.
- Make the banner shape by cutting a small triangle from one end of the strip.
- Layer the banners against the left edge of the card overlapping some.
- Add stamped "happy birthday".
- Add brads and twine.


Card ♥ #2 - Pennant Card
Instructions
- Cut small triangles from patterned paper.(I used Dear Lizzy Neopalitan collection from American Crafts) and mat triangles with a coordinating paper.
- Attach pennants to card base using foam tape for dimension.
- Add washi tape to the bottom edge of the card.
-  Stamp happy birthday and attach to a strip of paper cut into a banner.
- Tie twine and add a brad.
  

Card ♥ #3 - Pinwheel Card
Instructions
- Stamp "happy birthday" and attach to a paper strip cut in a banner shape.
- Add washi tape to the bottom edge of the card.
- Tie twine to the top of the card.
- Add pinwheels to card using foam tape.


Making Pinwheels
 

- Cut (2) 2"x2" squares for the pinwheels.
Make sure to use double sided paper for the pinwheels. Both sides of the paper will show.

- Cut from the corners towards the center (be careful not to cut all the way through and leave enough space to make a hole punch).

- Using an extra small hole punch, punch a hole on the same side of each triangle you have created and a hole in the center.

- Fold down the corners to match the hole in the center.

- Add a brad through the holes and you have an easy peasy pinwheel.


You can win this birthday card set (it includes matching envelopes) by becoming a follower of ihearthello or by simply commenting on this post.  Thanks for reading and I hope this inspires you to make some cards this weekend.

Monday, May 13, 2013

Handmade Gifts

My good friends the Dixons in cross stitch form. 
The best gifts are handmade ones (at least I hope so).  Now this post is a departure from the papercrafts I normally make but this is such a cute idea I wanted to share it and inspire others to try it.  I should first admit, I ♥ Pinterest.  One of the people I follow on Pinterest posted the following link to making a cross-stitch family portrait and I had to try it. 
Cross Stitch Family Portrait
I immediately thought, what a perfect Mother's day gift for my friend Melissa.  I can honestly say, this was a pretty easy project even for a novice cross stitcher like myself.  The link above provides a guide with templates you can easily customize to make your own family in cross stitch form.  The possibilities are endless.  This took me a few hours to complete and the hardest part was deciding colors for the outfits and stitching the letters.  I was so excited to finish this project that I had to share it immediately with my friend so I could also share it on the blog.  I plan to iron it and frame it before presenting it to her.  The finished project will easily fit in a 5x7 picture frame. I encourage everyone to give it a try. 

Friday, May 10, 2013

Keepin' it fresh and interesting

So I read a lot of blogs to get inspiration (there are so many talented people out there).  What I noticed about the blogs I most like to read is that there is consistency to them.  Their authors post on a schedule, have specific topics they post on regularly and there is a certain format to their blogs.  To improve i♥hello I plan to implement some improvements:

Posting at least twice a week on Mondays and Fridays
I realized all my favorite and most helpful blogs posted weekly on set days.  I think this makes it easy for followers to remember when new content is available. It also makes me more accountable to updating frequently.
New weekly feature: i ♥ cards
At the heart of my crafting I am a card maker and I think I should showcase that more on this blog. My first feature next week will highlight using the same supplies to make three cards with different looks.
Tutorials and Step by Step photos
I noticed write about a lot of projects, but haven't done a good job at showing how to make these projects.  I am going to try to do more specific technique how to blog posts and step by step photos. Also including measurements and dimensions so you can re-create the projects at home.

I also want to encourage more people to follow my blog so maybe I will start with a giveaway.
Right now, I have two followers (yay! thanks you two!!) and I think a number of people who read my blog but aren't necessarily followers.  I will come up with an awesome prize package and post it on Monday and see if I can't drum up some more people to follow this blog.  People like giveaways right?

One last thing, for national craft month I made a promise to make gifts for people and so far I only have one more gift to mail out and two more presents to present in person to fulfill my promise.  Working full time and crafting is hard work my friends, but totally worth it :)

Sunday, April 28, 2013

Cards using Perfect Pearls

I love reading other crafty blogs and learning about new (or rather new to me) products and techniques.  Last week I watched an amazing video showcasing stamping and using Perfect Pearls.  You can find the blog post I was inspired by here:

http://nicholeheady.typepad.com/capture_the_moment/2013/04/make-it-monday-113.html

At first I was a little hesitant to try the Perfect Pearls.  Mostly I was afraid of the mess and getting pigment everywhere.  I feel the same way about glitter.  I love the stuff, but don't want to be walking around with flecks of glitter stuck to my nose.  The cards on the blog were so lovely, so I had to give it a try, and honestly I am super glad that I did.  Best tip ever - When working with glitter or fine pigments, use a Swiffer dust cloth to wipe down your surfaces and work space.  Keeps everything nice and tidy and fine particles really cling to them well.
I purchased the Ranger Perfect Pearls set from Michaels.  I chose a set that included four colors: Mandarin, Green Patina, Perfect Bronze and Biscotti.  I also bought the Ranger Perfect Medium to stamp my images with.  I love the way you can blend one pigment into another creating a smooth transition of color in one image.  It kind of seemed like magic when I made my first card.
I used Basic Grey's Medallion Stamps and a stamp set from Unity Stamps for these four cards.
It was really easy.  First stamp the image using the Perfect Medium, then apply the Perfect Pearls fine powder pigment with a paintbrush over the image, wipe away the excess powder and an iridescent image remains.
I made four cards in less than 30 minutes.  With a little bit of bronze metallic twine and a few orange rhinestones the cards were complete. I suggest watching the YouTube video included in the blog link above for complete instructions. 


Friday, April 19, 2013

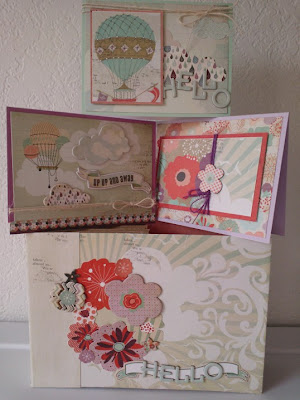
Another Card Book


So I should admit this was actually the first card book I made.  I sent it to a friend for her birthday but wasn't sure if she had received it yet, so I did not want to post it until I was sure.  At this point enough time has passed and hopefully it arrived safe and sound. I once again used the Stack the Deck binding system to make six pockets which fit six cards and envelopes inside.  The cover and folders are covered using Basic Grey's Fact and Fiction lines.  It is possible that the clouds are from a different Basic Grey line.  I love the whimsy of the clouds and kite for the cover.
I did not get a good picture of the cards I included in this card book. I used six cards from Pebbles Card Making pad and stickers from Elizabeth Craft designs for the cards. 
I absolutely love the Pebbles Card Making Pad.  Each pad contains 36 cards that are pre-scored and you can just tear out from the pad.  Each card is blank on the inside and the outside is a fun basic pattern.  Each pad contains nine different colors,two patterns for each color and two of each card.

 
The patterns include chevron and polka dots.   They are great basics and for a card maker like myself, these card pads are a must have.  I bought both the primaries and the brights color pads.  They can be purchased at www.pebblesinc.com


Friday, April 5, 2013

Card Books


So recently I have been really into making mini-albums.  As I have mentioned before, I ♥ papercrafts and tend to lean more towards card making than scrapbooking.  Scrapbooking intimidates me, but mini-albums are smaller scaled like cards and easier for me to wrap my head around.  My recent obsession is combining the mini-album and cards into a card book.  Perfect for gift giving (in fact I gave this book to a friend for her birthday) the book holds six cards and can easily be reused to hold other cards or made into a mini album to hold photos and such. 
I used the "What's Up" collection by Basic Grey for the mini album and all the cards. I think the "Stack the Deck" book binding technique is the easiest way to make mini albums.  You can find the instructions on how to make a "Stack the Deck" binding here http://followingthepapertrail.blogspot.com/2011/12/on-first-day-of-christmas-projects-2011.html.
Each of these cards is A2 sized and I used A2 envelopes for the pockets of the book as well. Sooner or later I will charge the battery of my camera and stop using my cell phone to take photos for my blog.  Although I have to admit I think the camera on my cell phone is 14 megapixels and my camera is only 10. 
Side note: One of my goals for this year to get enough courage to make and sell these little gems and other papercrafts at a local craft fair.  Of course that requires having enough time and inventory to do so.  Hopefully one day I will get there, until then I will continue to make gifts for my friends and showcasing things here on my blog.   Additionally, I would love to teach a class at a local scrapbooking store as well.  Anyone interested in learning how to make one of these cards books?  Let me know and maybe I can put on a class.